Wednesday, December 7, 2011

FUN da-middles


I was in awe when I saw these on a baking blog a few months back. I was aware that you could make filled cupcakes, but I never thought of them being in simple box mix form! The next time I went to the grocery store, I made sure to look for them. There are three different flavors. Chocolate cupcakes with vanilla cream filling, vanilla cupcakes with chocolate cream filling and the kind I got - vanilla cupcakes with vanilla cream filling.


I wasn't sure if I was suppose to frost them or not..I looked it up and not a lot of people did, so I didn't either. I'm sure it'd be good with frosting, but it was fine without. I'd recommend trying them if you want something sweet. They're so quick and simple to make.


They even have a fun little video on the Betty Crocker website showing you how easy they are to make.


My New Mixer!

So I know I have not posted in awhile, but I've still been cooking and baking a lot. I do have a few recipes to post, I just haven't gotten around to uploading the pictures and such. But now my posts will be a lot more consistent! Winter is my favorite time to try new baking recipes. I already have a few different types of cookies in mind that I plan on making once it gets closer to Christmas, so be on the lookout for those!

For this blog post, I just wanted to share the excitement over my new mixer..


I now own the dream mixer! (Well, my dream mixer anyway!)


Isn't it so pretty??


You can bet I will be baking up a storm with this mixer!

Wednesday, October 26, 2011

Cauliflower Pizza


I first heard of cauliflower pizza on Pinterest. It looked like regular pizza..and since I'm always trying to find healthier alternatives to the food I already love, I thought I would give this a try. It actually turned out really good. I liked it a lot - I told a lot of people that I could probably switch to this kind and wouldn't miss the regular dough, and I really think I could. It has a unique taste. The crust doesn't taste like dough, but it doesn't taste like cauliflower either. I would recommend trying it out. It cuts back on calories and carbs, so I didn't feel guilty about having an extra piece!

Since everyone likes different cheeses and toppings, I didn't think taking a picture of the ingredients was necessary. The only thing you will definitely need is :

1 head of cauliflower (grated, you'll probably need 2 cups)
2 eggs (I used 1 whole egg and 1 egg white)
14 oz. jar of pizza sauce


First you'll want to cut up and steam your cauliflower.


While your waiting on the cauliflower, cut up any veggies you want to use on your pizza. For me, it was tomato and onion!


You can preheat your oven awhile to 450. Then, using a food processor, grate the cauliflower so that it looks almost like rice. I've seen that mentioned a few times in different recipes, and that's pretty much the best way to describe it.


Now add in your eggs and give it a stir.


Spray your pan with cooking spray and then spread your 'dough' evenly. You basically just form it into a circle and make sure it's all sticking together the best you can, just so it holds its shape. You can also do a square shape if you'd rather it like that. Sprinkle with whatever seasonings you'd like. I used parsley, oregano and a little bit of garlic powder.


You want to pop it in the oven for 12-15 minutes, just to let the crust set up. Take it out and add your pizza sauce (I didn't use the whole jar, just use what you like), then add your cheese and toppings. Then turn the heat up to broil until the cheese is melted and the crust is crispy.


This is what it looks like when it's done. You can see I added some vegetarian pepperoni to half of the pizza too. 


Here's a close up. Doesn't it look tasty?

Thursday, August 25, 2011

Broccoli, Rice & Cheese Pockets


I love the broccoli and cheese combination. I eat it on a regular basis. Rice is also a common thing I eat, so this pocket is amazing to me. Since I'm a vegetarian, it's hard to find these kinds of things in the store. Most 'pockets' out there usually have chicken in them or some kind of meat. So I thought I would just make my own. I prefer homemade things over something frozen any day, anyway.


Ingredients:
   1 package Green Giant Broccoli & Cheese Sauce
   3 cups of brown rice
   1 roll of crescent rolls
   Parmesan cheese
   Cooking spray or butter


First boil your broccoli and cheese pouch. I'm not 100% how long this takes, just follow the directions on the box.


While your broccoli is heating up, start cooking your rice as well. You can use any kind of rice you want. I just like brown better, so that's what I used.


Next, get a tray and spread out your crescent roll.


Cut into four squares.


Mix together your broccoli and cheese sauce with your rice. You don't have to use all the rice either, if you like a lot then use it all.


Scoop your mixture onto your squares. Try to get an even amount on each one.


Sprinkle with mozzarella cheese.


You want to bake them for 20 minutes at 350. Spray some cooking oil on the top of each one before putting it in the oven. I forgot to take a picture of how they looked folded over before they were cooked but this is what it looked like afterwards.


And this is how they look on the inside. Delish!

Cupcake Truffles


If you couldn't tell by now, I love making truffles. I've already posted about making Oreo Truffles and Peanut Butter Truffles and I have a few others in mind that I would like to try eventually. I don't know what it is about them. I think they're just cute and tiny and usually pretty simple to make! This time I wanted to try cupcake truffles! I saw them at a store in the mall and instead of buying them, I wanted to make them myself. They turned out pretty good, everyone who tried one said they liked them.


Chocolate Ingredients:
   3 cups semi-sweet chocolate chips
   1 can sweetened condensed milk
   1 tbs. vanilla


In a bowl or saucepan melt the chocolate chips with the condensed milk. I used the microwave, putting them in for a minute at a time until I had a smooth consistency. 


It'll look something like this!


What you want to do next, is place your mixture in the fridge for a little bit. I left mine in for about 20 minutes. Once it was a little more firm I got it out and started pressing the mixture into these Reese's-shaped candy molds. 


Once you have a full tray done, put them back in the refrigerator for a few hours.

Once it gets close to getting your chocolates out of the refrigerator, you can start making your frosting. I got this one from the Food Network's website. 

Ingredients:
   3 cups confectioners' sugar
   1 cup butter
   1 tsp. vanilla
   1 to 2 tsp. whipping cream


I used a hand mixer to blend it all together. It'll look like this.


Your last step (and the best part) is to decorate your chocolates! I used sprinkles on the top of mine just so they looked more like a cupcake but I've seen people use nonpareils, red hots, and actual cherries. So you can just be creative with it.

Friday, July 22, 2011

Chocolate Chip Cookie Dough Cupcakes


I stumbled across these cupcakes on a few other cooking blogs and decided to give them a try myself. I made them for a 4th of July cookout that my family was having. I made about 24 cupcakes to take along and they were gone by the end of the night! A few people there wanted to take some home with them, or save a few back for someone else to try. I was so happy that everyone liked them!

For this post, there won't be quite as many pictures. I made everything homemade. The filling, the cookies, the cupcakes and the frosting. The entire process took me over 4 hours, so it was hard to document every little step I did. There are still a decent amount of pictures though!


Step One: Cookie Dough Filling


Ingredients:
4 tbsp. unsalted butter, room temperature (I forgot to add that into the picture!)
6 tbsp. light brown sugar, packed
1 cup plus 2 tbsp. all-purpose flour
7 oz. sweetened condensed milk
1/2 tsp. vanilla extract
1/4 cup mini semisweet chocolate chips


Combine the butter and sugar in a mixing bowl and mix on medium speed until it's light and fluffy, which will take about 2 minutes. Beat in the flour, sweetened condensed milk and vanilla until your mixture is smooth. Stir in the chocolate chips with a spatula. It should look like the picture above once you've done these steps. Cover with plastic wrap and refrigerate until the mixture has firmed up a little bit.


Once you've let it harden up a bit in the fridge, you're going to form the cookie dough into balls. The recipe I went by said to get a ice cream scooper, scoop out some of the mixture and then divide that in half to make one ball. Which is what I did. I would suggest making them a little bit bigger though. I was hesitant since this was my first time making them, I wanted to make sure they'd fit in the cupcakes..but next time I'll be making them a little bit bigger than this.


Form as many as you can until you've run out of mixture. I got two trays out of mine. Now pop them in the freezer!
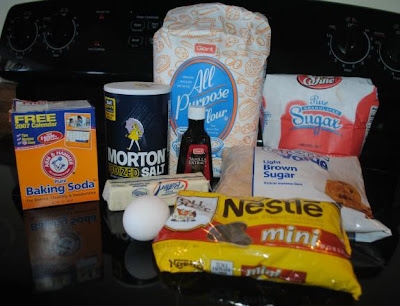
Step Two: Cookies
   

Ingredients:
2 cups all-purpose flour
1/2 teaspoon baking soda
1/2 teaspoon salt
3/4 cup unsalted butter, melted
1 cup packed brown sugar
1/2 cup white sugar
1 tablespoon vanilla extract
1 egg
12 ounce package of chocolate chips (about 2 cups)


This step is optional. I think it just makes the cupcakes look cute and is a 'sweet' little bonus for whoever is eating the cupcakes. In a medium sized bowl mix together the butter, brown sugar and white sugar. Beat in egg and vanilla until creamy. Stir in the chocolate chips. Then pop the mixture into the fridge for about 30 minutes to let it harden up before you try to form your cookies.


Form little balls out of the dough. Bake at 375° for 8-12 minutes.


Cookies after baking!


Mmm.


Step three: Cupcakes


Ingredients:
3 sticks unsalted butter, at room temperature
1 1/2 cups light brown sugar, packed
4 large eggs
2 2/3 cups all-purpose flour
1 tsp. baking powder
1 tsp. baking soda
1/4 tsp. salt
1 cup milk
2 tsp. vanilla extract
1/2 cup semisweet chocolate chips


Preheat the oven to 350°. Line two cupcake pans with cupcake papers. First combine the butter and brown sugar. Beat together on medium speed until light and fluffy, which will take about 3 minutes. Mix in the eggs one at a time, beating well after each addition and scraping down the sides of the bowl as needed. Combine the flour, baking powder, baking soda, and salt in a medium bowl. Stir that in with the butter and brown sugar mixture. Mix on a low speed, then add the milk and vanilla. Fold in the chocolate chips with a spatula. Now, you can add as many chocolate chips as you want. The recipe I went by called for one cup but since I made the cookies, and knew the filling had a lot of chocolate chips, I only used 1/2 cup.


What you want to do next is scoop your batter into the cupcake papers. Once you've done that, get the chocolate chip cookie dough balls (the filling) that you made earlier and put them in the center of the batter.


Once the cupcakes bake, you won't be able to see much of the filling. Even if a little shows like in the picture above, it won't matter because it will be hidden under the frosting!


Step Four: Brown Sugar Frosting


Ingredients:
3 sticks unsalted butter (1 1/2 cups)
3/4 cup light brown sugar, packed
3 1/2 cups powdered sugar
1 cup all purpose flour
3/4 tsp. salt
3 tbs. milk
2 1/2 tsp. vanilla extract


Beat together the butter and brown sugar until smooth. Mix in the powdered sugar. Beat in the flour and salt. Then mix in the milk and vanilla until smooth. Make sure everything is well blended.


Aren't they cute? 


I should have gotten a better picture of the inside right when I was finished but I forgot. This cupcake was one that I didn't think looked as good as the others, so I didn't put it in with the ones I took to the cookout. My fiance was about to eat it and I said, 'Wait wait! Let me take a picture!' I didn't want to mess around trying to get the best angle since he was waiting to eat it so this was the best I got!


Enjoy!